Javascript Fastest Way to Draw Circles to Screen
Cartoon graphics
Graphics on the Web
As we talked near in our HTML Multimedia and embedding module, the Web was originally just text, which was very boring, so images were introduced — start via the <img> element and later via CSS properties such as background-paradigm, and SVG.
This however was still non enough. While yous could use CSS and JavaScript to breathing (and otherwise manipulate) SVG vector images — as they are represented by markup — there was still no manner to exercise the same for bitmap images, and the tools bachelor were rather express. The Web still had no way to effectively create animations, games, 3D scenes, and other requirements ordinarily handled by lower level languages such equally C++ or Coffee.
The state of affairs started to improve when browsers began to support the <canvas> element and associated Canvas API — Apple invented it in around 2004, and other browsers followed by implementing it in the years that followed. As you'll see below, canvass provides many useful tools for creating second animations, games, data visualizations, and other types of app, specially when combined with some of the other APIs the web platform provides.
The below example shows a simple second sail-based bouncing assurance animation that we originally met in our Introducing JavaScript objects module:
Around 2006–2007, Mozilla started work on an experimental 3D canvas implementation. This became WebGL, which gained traction among browser vendors, and was standardized around 2009–2010. WebGL allows you to create real 3D graphics inside your web browser; the below instance shows a simple rotating WebGL cube:
This article will focus mainly on 2nd canvas, as raw WebGL code is very circuitous. We will however show how to utilise a WebGL library to create a 3D scene more easily, and you tin discover a tutorial covering raw WebGL elsewhere — see Getting started with WebGL.
Note: Basic canvas functionality is supported well across browsers, with the exception of IE 8 and below for 2d canvas, and IE eleven and below for WebGL.
Active learning: Getting started with a <canvas>
If y'all desire to create a 2d or 3D scene on a web folio, you need to kickoff with an HTML <sheet> element. This element is used to define the area on the folio into which the image will be drawn. This is as simple as including the element on the folio:
<canvass width = "320" height = "240" > </sheet > This volition create a sail on the page with a size of 320 past 240 pixels.
Inside the canvas tags, you tin put some fallback content, which is shown if the user'south browser doesn't back up canvass.
<sheet width = "320" meridian = "240" > <p > Your browser doesn't support canvas. Boo hoo! </p > </canvas > Of class, the above bulletin is actually unhelpful! In a real example you'd desire to relate the fallback content to the canvas content. For example, if you were rendering a constantly updating graph of stock prices, the fallback content could be a static image of the latest stock graph, with alt text maxim what the prices are in text.
Creating and sizing our canvass
Allow'southward commencement past creating our own sail that we draw hereafter experiments on to.
- First make a local copy of the 0_canvas_start directory. It contains three files:
- "alphabetize.html"
- "script.js"
- "mode.css"
- Open up "index.html", and add the following code into information technology, only below the opening
<body>tag:We have added a<canvas class = "myCanvas" > <p > Add suitable fallback here. </p > </sheet >classto the<canvas>element then information technology volition be easier to select if we have multiple canvases on the folio, but we have removed thewidthandsummitattributes for at present (you lot could add them back in if you wanted, but we will gear up them using JavaScript in a below department). Canvases with no explicit width and height default to 300 pixels wide by 150 pixels high. - Now open "script.js" and add the following lines of JavaScript: Here nosotros take stored a reference to the canvas in the
const sail = document. querySelector ( '.myCanvas' ) ; const width = canvas.width = window.innerWidth; const pinnacle = canvas.height = window.innerHeight;sheetconstant. In the second line we fix both a new abidingwidthand the canvas'widthholding equal toWindow.innerWidth(which gives u.s.a. the viewport width). In the third line we set up both a new constantheightand the sheet'meridianproperty equal toWindow.innerHeight(which gives us the viewport top). So at present we have a canvas that fills the entire width and height of the browser window! You'll likewise see that we are chaining assignments together with multiple equals signs — this is immune in JavaScript, and it is a good technique if you desire to make multiple variables all equal to the same value. We wanted to brand the canvas width and height hands accessible in the width/height variables, as they are useful values to have available for later (for example, if you want to draw something exactly halfway beyond the width of the canvas).
Note: You should generally fix the size of the image using HTML attributes or DOM properties, as explained to a higher place. You could employ CSS, but the trouble so is that the sizing is done after the canvass has rendered, and just like whatever other image (the rendered canvas is just an image), the image could become pixelated/distorted.
Getting the canvass context and final setup
We demand to do ane final thing before nosotros tin consider our sheet template finished. To draw onto the canvas we need to get a special reference to the drawing area called a context. This is done using the HTMLCanvasElement.getContext() method, which for basic usage takes a unmarried string as a parameter representing the type of context yous want to recall.
In this case we want a 2d canvas, so add the following JavaScript line beneath the others in "script.js":
const ctx = canvas. getContext ( '2d' ) ; Note: other context values you lot could choose include webgl for WebGL, webgl2 for WebGL ii, etc., but we won't need those in this article.
So that'south it — our canvas is now primed and gear up for cartoon on! The ctx variable now contains a CanvasRenderingContext2D object, and all cartoon operations on the canvas volition involve manipulating this object.
Let's practise one last affair before we move on. We'll colour the canvas background blackness to give you a starting time taste of the sail API. Add together the following lines at the bottom of your JavaScript:
ctx.fillStyle = 'rgb(0, 0, 0)' ; ctx. fillRect ( 0 , 0 , width, acme) ; Hither we are setting a fill color using the canvas' fillStyle property (this takes color values just like CSS properties practise), then drawing a rectangle that covers the entire area of the canvas with thefillRect method (the first two parameters are the coordinates of the rectangle'southward top left hand corner; the last two are the width and height you want the rectangle drawn at — we told you those width and elevation variables would be useful)!
OK, our template is done and it's time to move on.
2d canvass basics
As we said above, all drawing operations are done by manipulating a CanvasRenderingContext2D object (in our case, ctx). Many operations demand to be given coordinates to pinpoint exactly where to draw something — the top left of the canvas is signal (0, 0), the horizontal (x) axis runs from left to right, and the vertical (y) axis runs from meridian to lesser.
Drawing shapes tends to exist done using the rectangle shape archaic, or by tracing a line along a certain path and and then filling in the shape. Below we'll show how to do both.
Unproblematic rectangles
Permit's offset with some simple rectangles.
- Get-go of all, take a re-create of your newly coded sail template (or brand a local copy of the 1_canvas_template directory if y'all didn't follow the in a higher place steps).
- Next, add the following lines to the bottom of your JavaScript: If you lot salve and refresh, y'all should see a reddish rectangle has appeared on your canvas. Its tiptop left corner is 50 pixels away from the top and left of the sheet edge (equally defined past the first two parameters), and information technology is 100 pixels wide and 150 pixels alpine (as defined by the third and fourth parameters).
ctx.fillStyle = 'rgb(255, 0, 0)' ; ctx. fillRect ( 50 , 50 , 100 , 150 ) ; - Let'south add together another rectangle into the mix — a light-green ane this time. Add the following at the bottom of your JavaScript: Save and refresh, and yous'll see your new rectangle. This raises an of import point: graphics operations similar drawing rectangles, lines, and and so along are performed in the order in which they occur. Call up of information technology like painting a wall, where each coat of paint overlaps and may fifty-fifty hide what's underneath. You can't do annihilation to alter this, so y'all have to recall carefully about the order in which yous draw the graphics.
ctx.fillStyle = 'rgb(0, 255, 0)' ; ctx. fillRect ( 75 , 75 , 100 , 100 ) ; - Annotation that you can depict semi-transparent graphics by specifying a semi-transparent colour, for example by using
rgba(). Theavalue defines what'due south called the "alpha aqueduct, " or the corporeality of transparency the colour has. The college its value, the more it will obscure whatever'southward behind it. Add the following to your code:ctx.fillStyle = 'rgba(255, 0, 255, 0.75)' ; ctx. fillRect ( 25 , 100 , 175 , fifty ) ; - Now try drawing some more rectangles of your own; accept fun!
Strokes and line widths
So far we've looked at drawing filled rectangles, merely you can as well draw rectangles that are but outlines (chosen strokes in graphic design). To set the color you want for your stroke, you lot employ the strokeStyle belongings; drawing a stroke rectangle is washed using strokeRect.
- Add the following to the previous example, again below the previous JavaScript lines:
ctx.strokeStyle = 'rgb(255, 255, 255)' ; ctx. strokeRect ( 25 , 25 , 175 , 200 ) ; - The default width of strokes is 1 pixel; you lot can adjust the
lineWidthproperty value to change this (it takes a number representing the number of pixels wide the stroke is). Add the following line in between the previous two lines:
Now you should see that your white outline has become much thicker! That's it for at present. At this point your instance should expect similar this:
Drawing paths
If yous desire to describe anything more complex than a rectangle, you need to draw a path. Basically, this involves writing code to specify exactly what path the pen should motility along on your canvas to trace the shape y'all desire to describe. Canvas includes functions for drawing straight lines, circles, Bézier curves, and more.
Let's first the section off by making a fresh copy of our canvas template (1_canvas_template), in which to draw the new example.
We'll be using some mutual methods and properties beyond all of the below sections:
-
beginPath()— kickoff drawing a path at the point where the pen currently is on the canvas. On a new canvas, the pen starts out at (0, 0). -
moveTo()— motility the pen to a unlike signal on the canvas, without recording or tracing the line; the pen "jumps" to the new position. -
fill()— draw a filled shape by filling in the path you've traced then far. -
stroke()— describe an outline shape past cartoon a stroke along the path you lot've drawn so far. - You tin can also use features like
lineWidthandfillStyle/strokeStylewith paths as well as rectangles.
A typical, unproblematic path-drawing operation would await something like so:
ctx.fillStyle = 'rgb(255, 0, 0)' ; ctx. beginPath ( ) ; ctx. moveTo ( 50 , 50 ) ; // depict your path ctx. fill ( ) ; Drawing lines
Let's draw an equilateral triangle on the sail.
- Get-go of all, add the post-obit helper part to the bottom of your code. This converts degree values to radians, which is useful considering whenever you demand to provide an angle value in JavaScript, it will virtually ever be in radians, but humans unremarkably think in degrees.
role degToRad ( degrees ) { return degrees * Math. PI / 180 ; } - Side by side, start off your path by adding the following beneath your previous improver; here we set a color for our triangle, commencement cartoon a path, and and then move the pen to (fifty, 50) without drawing annihilation. That'due south where we'll kickoff cartoon our triangle.
ctx.fillStyle = 'rgb(255, 0, 0)' ; ctx. beginPath ( ) ; ctx. moveTo ( fifty , 50 ) ; - Now add the following lines at the lesser of your script: Permit's run through this in order: First we draw a line across to (150, l) — our path now goes 100 pixels to the right along the ten axis. Second, we work out the height of our equilateral triangle, using a bit of unproblematic trigonometry. Basically, we are cartoon the triangle pointing downwards. The angles in an equilateral triangle are always threescore degrees; to work out the superlative we can split it down the middle into 2 right-angled triangles, which volition each have angles of xc degrees, 60 degrees, and xxx degrees. In terms of the sides:
ctx. lineTo ( 150 , l ) ; const triHeight = l * Math. tan ( degToRad ( 60 ) ) ; ctx. lineTo ( 100 , l + triHeight) ; ctx. lineTo ( l , fifty ) ; ctx. fill up ( ) ;- The longest side is called the hypotenuse
- The side next to the lx degree angle is chosen the adjacent — which we know is 50 pixels, as information technology is one-half of the line we just drew.
- The side opposite the 60 caste bending is called the reverse, which is the pinnacle of the triangle we desire to calculate.
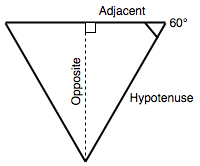 1 of the basic trigonometric formulae states that the length of the adjacent multiplied by the tangent of the angle is equal to the opposite, hence we come up with
 50 * Math.tan(degToRad(60)). We use ourdegToRad()function to convert 60 degrees to radians, equallyMath.tan()expects an input value in radians. - With the height calculated, nosotros draw another line to
(100, 50 + triHeight). The X coordinate is elementary; information technology must be halfway between the previous two X values we set. The Y value on the other hand must be 50 plus the triangle height, as we know the meridian of the triangle is 50 pixels from the top of the canvas. - The next line draws a line back to the starting point of the triangle.
- Final of all, we run
ctx.fill()to end the path and fill up in the shape.
Cartoon circles
At present let's look at how to draw a circle in canvas. This is accomplished using the arc() method, which draws all or part of a circumvolve at a specified betoken.
- Allow'due south add an arc to our sail — add the following to the bottom of your code:
ctx.fillStyle = 'rgb(0, 0, 255)' ; ctx. beginPath ( ) ; ctx. arc ( 150 , 106 , fifty , degToRad ( 0 ) , degToRad ( 360 ) , faux ) ; ctx. fill ( ) ;arc()takes 6 parameters. The first two specify the position of the arc'due south centre (X and Y, respectively). The third is the circle'southward radius, the fourth and fifth are the start and cease angles at which to describe the circumvolve (then specifying 0 and 360 degrees gives usa a full circle), and the sixth parameter defines whether the circle should be fatigued counterclockwise (anticlockwise) or clockwise (falseis clockwise).Note: 0 degrees is horizontally to the correct.
- Permit's effort calculation some other arc: The blueprint here is very similar, but with two differences:
ctx.fillStyle = 'yellowish' ; ctx. beginPath ( ) ; ctx. arc ( 200 , 106 , 50 , degToRad ( - 45 ) , degToRad ( 45 ) , true ) ; ctx. lineTo ( 200 , 106 ) ; ctx. fill ( ) ;- We accept gear up the last parameter of
arc()totrue, meaning that the arc is drawn counterclockwise, which means that even though the arc is specified as starting at -45 degrees and ending at 45 degrees, we depict the arc around the 270 degrees not inside this portion. If you were to changetruetosimulatedand so re-run the code, only the xc degree slice of the circle would exist fatigued. - Before calling
make full(), we draw a line to the heart of the circle. This ways that we get the rather overnice Pac-Man-mode cutout rendered. If you removed this line (try it!) so re-ran the lawmaking, you'd get simply an border of the circle chopped off between the start and end point of the arc. This illustrates another important point of the canvas — if you try to make full an incomplete path (i.e. ane that is not closed), the browser fills in a direct line between the offset and cease point and then fills information technology in.
- We accept gear up the last parameter of
That'south it for at present; your final instance should look similar this:
Note: The finished lawmaking is available on GitHub as 3_canvas_paths.
Note: To find out more almost advanced path drawing features such as Bézier curves, check out our Drawing shapes with sheet tutorial.
Text
Canvas too has features for drawing text. Allow'due south explore these briefly. Start by making another fresh copy of our canvas template (1_canvas_template) in which to draw the new example.
Text is drawn using two methods:
-
fillText()— draws filled text. -
strokeText()— draws outline (stroke) text.
Both of these take three backdrop in their basic usage: the text string to depict and the X and Y coordinates of the bespeak to showtime drawing the text at. This works out as the bottom left corner of the text box (literally, the box surrounding the text you lot describe), which might misfile you as other cartoon operations tend to beginning from the top left corner — bear this in mind.
At that place are too a number of properties to help control text rendering such as font, which lets y'all specify font family, size, etc. It takes equally its value the same syntax as the CSS font holding.
Try adding the following block to the bottom of your JavaScript:
ctx.strokeStyle = 'white' ; ctx.lineWidth = 1 ; ctx.font = '36px arial' ; ctx. strokeText ( 'Sail text' , fifty , fifty ) ; ctx.fillStyle = 'red' ; ctx.font = '48px georgia' ; ctx. fillText ( 'Sail text' , fifty , 150 ) ; Here we depict ii lines of text, 1 outline and the other stroke. The final case should look like so:
Note: The finished lawmaking is available on GitHub as 4_canvas_text.
Accept a play and meet what you can come up up with! Y'all can find more information on the options bachelor for sheet text at Drawing text.
Drawing images onto sail
It is possible to render external images onto your canvas. These tin can exist unproblematic images, frames from videos, or the content of other canvases. For the moment nosotros'll simply wait at the case of using some simple images on our canvas.
- As before, brand another fresh copy of our canvas template (1_canvas_template) in which to describe the new example. Images are drawn onto sheet using the
drawImage()method. The simplest version takes three parameters — a reference to the image y'all desire to render, and the 10 and Y coordinates of the image's tiptop left corner. - Let'due south start past getting an image source to embed in our canvas. Add the following lines to the bottom of your JavaScript: Here we create a new
const paradigm = new Prototype ( ) ; image.src = 'firefox.png' ;HTMLImageElementobject using theEpitome()constructor. The returned object is the same type as that which is returned when y'all grab a reference to an existing<img>element). Nosotros then set itssrcattribute to equal our Firefox logo prototype. At this point, the browser starts loading the image. - Nosotros could now try to embed the image using
drawImage(), but nosotros need to make certain the image file has been loaded starting time, otherwise the code volition neglect. Nosotros tin can achieve this using theloadevent, which will only be fired when the image has finished loading. Add together the following cake below the previous one:If you load your example in the browser now, y'all should see the paradigm embedded in the canvas.epitome. addEventListener ( 'load' , ( ) => ctx. drawImage (image, xx , xx , 185 , 175 , 50 , l , 185 , 175 ) ) ; - But there's more than! What if we desire to display only a part of the image, or to resize information technology? We can exercise both with the more complex version of
drawImage(). Update yourctx.drawImage()line like then:ctx. drawImage (image, twenty , xx , 185 , 175 , 50 , 50 , 185 , 175 ) ;- The get-go parameter is the image reference, as before.
- Parameters 2 and iii define the coordinates of the top left corner of the area you want to cut out of the loaded image, relative to the top-left corner of the image itself. Cypher to the left of the commencement parameter or above the second volition be drawn.
- Parameters iv and 5 define the width and acme of the area we want to cut out from the original prototype nosotros loaded.
- Parameters 6 and 7 ascertain the coordinates at which y'all want to depict the peak-left corner of the cut-out portion of the image, relative to the top-left corner of the canvass.
- Parameters viii and 9 define the width and elevation to draw the cut-out area of the image. In this case, nosotros have specified the same dimensions as the original slice, merely yous could resize it past specifying dissimilar values.
The final case should await like and then:
Note: The finished code is available on GitHub as 5_canvas_images.
Loops and animations
We have so far covered some very basic uses of 2D sail, but really you won't experience the full ability of canvas unless y'all update or animate it in some style. Later all, canvas does provide scriptable images! If you aren't going to alter annihilation, then you might equally well simply use static images and save yourself all the work.
Creating a loop
Playing with loops in canvas is rather fun — you can run canvas commands inside a for (or other type of) loop simply like any other JavaScript lawmaking.
Let'southward build a simple instance.
- Make another fresh copy of our canvas template (1_canvas_template) and open information technology in your code editor.
- Add the following line to the lesser of your JavaScript. This contains a new method,
interpret(), which moves the origin indicate of the canvas:This causes the coordinate origin (0, 0) to be moved to the center of the canvas, rather than being at the top left corner. This is very useful in many situations, like this ane, where we want our pattern to be fatigued relative to the center of the canvass.ctx. interpret (width/ 2 , height/ 2 ) ; - At present add the following code to the bottom of the JavaScript: Here nosotros are implementing the same
office degToRad ( degrees ) { return degrees * Math. PI / 180 ; } function rand ( min, max ) { return Math. floor (Math. random ( ) * (max-min+ ane ) ) + (min) ; } let length = 250 ; let moveOffset = 20 ; for ( let i = 0 ; i < length; i++ ) { }degToRad()function we saw in the triangle example above, arand()function that returns a random number between given lower and upper premises,lengthandmoveOffsetvariables (which we'll find out more about after), and an emptyforloop. - The idea here is that we'll draw something on the canvas within the
forloop, and iterate on it each time and then we can create something interesting. Add the following code inside yourforloop:So on each iteration, we:ctx.fillStyle = ` rgba( ${ 255 -length} ,0, ${ 255 -length} ,0.ix) ` ; ctx. beginPath ( ) ; ctx. moveTo (moveOffset,moveOffset) ; ctx. lineTo (moveOffset+length,moveOffset) ; const triHeight = length/ ii * Math. tan ( degToRad ( threescore ) ) ; ctx. lineTo (moveOffset+ (length/ 2 ) ,moveOffset+triHeight) ; ctx. lineTo (moveOffset,moveOffset) ; ctx. fill ( ) ; length-- ; moveOffset += 0.7 ; ctx. rotate ( degToRad ( 5 ) ) ;- Set the
fillStyleto be a shade of slightly transparent purple, which changes each fourth dimension based on the value oflength. As you'll see after the length gets smaller each time the loop runs, and so the outcome hither is that the color gets brighter with each successive triangle fatigued. - Begin the path.
- Move the pen to a coordinate of
(moveOffset, moveOffset); This variable defines how far we want to move each time nosotros draw a new triangle. - Draw a line to a coordinate of
(moveOffset+length, moveOffset). This draws a line of lengthlengthparallel to the X axis. - Calculate the triangle'southward height, equally before.
- Draw a line to the downwards-pointing corner of the triangle, and then draw a line dorsum to the start of the triangle.
- Call
fill()to fill up in the triangle. - Update the variables that describe the sequence of triangles, and then nosotros can exist ready to draw the next one. We subtract the
lengthvalue by 1, and then the triangles get smaller each time; increasemoveOffsetpast a modest amount and so each successive triangle is slightly further away, and apply another new function,rotate(), which allows us to rotate the entire canvas! Nosotros rotate it by five degrees before drawing the next triangle.
- Set the
That's information technology! The final example should wait similar so:
At this point, we'd similar to encourage you to play with the instance and make information technology your own! For example:
- Draw rectangles or arcs instead of triangles, or fifty-fifty embed images.
- Play with the
lengthandmoveOffsetvalues. - Introduce some random numbers using that
rand()office we included to a higher place but didn't utilise.
Animations
The loop example nosotros built above was fun, just really you need a constant loop that keeps going and going for any serious canvas applications (such as games and existent time visualizations). If you think of your canvas as existence like a movie, you really desire the display to update on each frame to show the updated view, with an ideal refresh rate of 60 frames per second so that move appears squeamish and smooth to the human centre.
There are a few JavaScript functions that will allow you to run functions repeatedly, several times a 2d, the best one for our purposes hither beingness window.requestAnimationFrame(). It takes one parameter — the name of the function you desire to run for each frame. The next time the browser is fix to update the screen, your function volition get chosen. If that part draws the new update to your animation, and so calls requestAnimationFrame() again just earlier the end of the function, the blitheness loop will continue to run. The loop ends when y'all stop calling requestAnimationFrame() or if you call window.cancelAnimationFrame() after calling requestAnimationFrame() but earlier the frame is called.
Note: It's good practise to call cancelAnimationFrame() from your main lawmaking when you're done using the blitheness, to ensure that no updates are notwithstanding waiting to exist run.
The browser works out complex details such as making the blitheness run at a consistent speed, and not wasting resources animative things that can't be seen.
To see how it works, permit's chop-chop await again at our Bouncing Assurance example (see it alive, and too see the source code). The code for the loop that keeps everything moving looks similar this:
office loop ( ) { ctx.fillStyle = 'rgba(0, 0, 0, 0.25)' ; ctx. fillRect ( 0 , 0 , width, height) ; for ( const ball of balls) { ball. depict ( ) ; ball. update ( ) ; ball. collisionDetect ( ) ; } requestAnimationFrame (loop) ; } loop ( ) ; Nosotros run the loop() role one time at the lesser of the code to start the bicycle, drawing the offset animation frame; the loop() function then takes charge of calling requestAnimationFrame(loop) to run the next frame of the animation, again and again.
Note that on each frame we are completely immigration the canvas and redrawing everything. For every ball present we draw it, update its position, and check to see if it is colliding with whatsoever other balls. One time you've fatigued a graphic to a canvas, there'south no way to manipulate that graphic individually like you tin can with DOM elements. Yous can't move each ball effectually on the canvas, because once it'southward drawn, information technology'due south part of the canvas, and is non an private accessible element or object. Instead, yous take to erase and redraw, either by erasing the entire frame and redrawing everything, or by having code that knows exactly what parts need to be erased and only erases and redraws the minimum area of the canvas necessary.
Optimizing blitheness of graphics is an entire specialty of programming, with lots of clever techniques available. Those are beyond what we need for our example, though!
In general, the process of doing a canvas animation involves the post-obit steps:
- Articulate the canvas contents (e.g. with
fillRect()orclearRect()). - Salve state (if necessary) using
save()— this is needed when y'all want to save settings y'all've updated on the sail before continuing, which is useful for more advanced applications. - Describe the graphics you are animating.
- Restore the settings you saved in footstep 2, using
restore() - Call
requestAnimationFrame()to schedule cartoon of the next frame of the animation.
Note: We won't cover save() and restore() hither, simply they are explained nicely in our Transformations tutorial (and the ones that follow information technology).
A simple character blitheness
Now let's create our own simple animation — nosotros'll get a character from a certain rather awesome retro computer game to walk across the screen.
- Make some other fresh re-create of our canvas template (1_canvas_template) and open it in your code editor.
- At the bottom of the JavaScript, add the post-obit line to one time again brand the coordinate origin sit in the eye of the canvas:
ctx. translate (width/ 2 , height/ 2 ) ; - Now let'southward create a new
HTMLImageElementobject, ready itssrcto the prototype nosotros desire to load, and add anonloadevent handler that will cause thedraw()function to fire when the image is loaded:const image = new Image ( ) ; image.src = 'walk-right.png' ; image.onload = draw; - At present we'll add together some variables to go along track of the position the sprite is to be drawn on the screen, and the sprite number we want to display. Let's explicate the spritesheet epitome (which we have respectfully borrowed from Mike Thomas' Create a sprite sheet walk cycle using CSS animation). The epitome looks like this:
let sprite = 0 ; permit posX = 0 ; Information technology contains six sprites that make up the whole walking sequence — each ane is 102 pixels wide and 148 pixels high. To display each sprite cleanly we will have to utilize
 drawImage()to chop out a single sprite paradigm from the spritesheet and display only that role, like we did above with the Firefox logo. The X coordinate of the slice volition accept to be a multiple of 102, and the Y coordinate will ever be 0. The slice size will always be 102 by 148 pixels. - At present let'due south insert an empty
draw()part at the bottom of the code, set up for filling up with some code: - The rest of the code in this section goes inside
draw(). First, add the post-obit line, which clears the canvas to prepare for drawing each frame. Discover that we have to specify the top-left corner of the rectangle every bit-(width/2), -(height/2)because nosotros specified the origin position equallywidth/two, height/2earlier on.ctx. fillRect ( - (width/ 2 ) , - (height/ 2 ) , width, height) ; - Next, nosotros'll depict our prototype using drawImage — the 9-parameter version. Add the following: As you can see:
ctx. drawImage (image, (sprite* 102 ) , 0 , 102 , 148 , 0 +posX, - 74 , 102 , 148 ) ;- We specify
epitomeevery bit the image to embed. - Parameters ii and 3 specify the top-left corner of the piece to cutting out of the source epitome, with the Ten value every bit
spritemultiplied by 102 (wherespriteis the sprite number between 0 and v) and the Y value e'er 0. - Parameters iv and 5 specify the size of the slice to cut out — 102 pixels past 148 pixels.
- Parameters 6 and 7 specify the top-left corner of the box into which to draw the slice on the canvas — the X position is 0 +
posX, meaning that nosotros tin can alter the drawing position by altering theposXvalue. - Parameters 8 and 9 specify the size of the paradigm on the canvas. We just want to keep its original size, then we specify 102 and 148 every bit the width and summit.
- We specify
- Now we'll alter the
spritevalue afterwards each draw — well, after some of them anyway. Add the following block to the lesser of thedraw()part:We are wrapping the whole block inif (posX % 13 === 0 ) { if (sprite === 5 ) { sprite = 0 ; } else { sprite++ ; } }if (posX % 13 === 0) { ... }. Nosotros use the modulo (%) operator (also known as the residuum operator) to check whether theposXvalue can be exactly divided by 13 with no remainder. If and then, nosotros move on to the side by side sprite by incrementingsprite(wrapping to 0 after we're done with sprite #v). This effectively means that we are just updating the sprite on every 13th frame, or roughly well-nigh 5 frames a second (requestAnimationFrame()calls united states of america at upwards to threescore frames per second if possible). We are deliberately slowing down the frame rate because we only accept six sprites to work with, and if we brandish one every 60th of a second, our character will movement mode too fast! Within the outer cake we use anif ... elsestatement to check whether thespritevalue is at 5 (the last sprite, given that the sprite numbers run from 0 to 5). If nosotros are showing the final sprite already, we resetspriteback to 0; if not we but increase it by 1. - Next we need to work out how to change the
posXvalue on each frame — add the following code cake merely below your last i.Nosotros are using some otherif (posX > width/ 2 ) { let newStartPos = - ( (width/ 2 ) + 102 ) ; posX = Math. ceil (newStartPos) ; console. log (posX) ; } else { posX += two ; }if ... elseargument to come across if the value ofposXhas get greater thanwidth/two, which ways our graphic symbol has walked off the correct edge of the screen. If and then, we calculate a position that would put the grapheme merely to the left of the left side of the screen. If our character hasn't yet walked off the edge of the screen, nosotros incrementposXby 2. This will make him motility a little bit to the right the adjacent time we draw him. - Finally, we need to make the animation loop by calling
requestAnimationFrame()at the lesser of thedraw()function:window. requestAnimationFrame (draw) ;
That's information technology! The final case should wait like so:
A simple cartoon application
As a final animation example, we'd like to show y'all a very unproblematic cartoon application, to illustrate how the animation loop tin be combined with user input (like mouse movement, in this case). We won't get you to walk through and build this one; we'll just explore the virtually interesting parts of the code.
The example tin can be found on GitHub equally 8_canvas_drawing_app, and you can play with information technology alive beneath:
Let'due south look at the most interesting parts. First of all, we keep track of the mouse's 10 and Y coordinates and whether it is being clicked or not with three variables: curX, curY, and pressed. When the mouse moves, we burn down a function fix as the onmousemove event handler, which captures the current 10 and Y values. We besides utilize onmousedown and onmouseup effect handlers to alter the value of pressed to true when the mouse button is pressed, and back to false again when information technology is released.
let curX; let curY; let pressed = false ; // update mouse pointer coordinates document. addEventListener ( 'mousemove' , e => { curX = (window.Event) ? e.pageX : e.clientX + (document.documentElement.scrollLeft ? certificate.documentElement.scrollLeft : document.body.scrollLeft) ; curY = (window.Effect) ? east.pageY : e.clientY + (document.documentElement.scrollTop ? document.documentElement.scrollTop : document.body.scrollTop) ; } ) ; canvas. addEventListener ( 'mousedown' , ( ) => pressed = true ) ; canvas. addEventListener ( 'mouseup' , ( ) => pressed = imitation ) ; When the "Clear canvas" button is pressed, we run a simple function that clears the whole sheet back to black, the aforementioned way we've seen before:
clearBtn. addEventListener ( 'click' , ( ) => { ctx.fillStyle = 'rgb(0,0,0)' ; ctx. fillRect ( 0 , 0 ,width,height) ; } ) ; The drawing loop is pretty simple this time effectually — if pressed is true, we draw a circle with a fill style equal to the value in the colour picker, and a radius equal to the value set in the range input. We take to describe the circle 85 pixels to a higher place where we measured it from, because the vertical measurement is taken from the top of the viewport, but we are drawing the circle relative to the top of the canvas, which starts below the 85 pixel-high toolbar. If nosotros drew it with just curY equally the y coordinate, it would appear 85 pixels lower than the mouse position.
office describe ( ) { if (pressed) { ctx.fillStyle = colorPicker.value; ctx. beginPath ( ) ; ctx. arc (curX, curY- 85 , sizePicker.value, degToRad ( 0 ) , degToRad ( 360 ) , imitation ) ; ctx. fill ( ) ; } requestAnimationFrame (draw) ; } draw ( ) ; Note: The <input> range and color types are supported adequately well across browsers, with the exception of Cyberspace Explorer versions less than 10; also Safari doesn't all the same support colour. If your browser doesn't back up these inputs, they will fall back to simple text fields and you'll only accept to enter valid color/number values yourself.
WebGL
It's at present time to leave second behind, and take a quick look at 3D canvas. 3D canvas content is specified using the WebGL API, which is a completely separate API from the 2d canvas API, even though they both return onto <sail> elements.
WebGL is based on OpenGL (Open Graphics Library), and allows you to communicate directly with the calculator'southward GPU. Every bit such, writing raw WebGL is closer to low level languages such every bit C++ than regular JavaScript; it is quite complex but incredibly powerful.
Using a library
Because of its complexity, most people write 3D graphics lawmaking using a third political party JavaScript library such equally 3.js, PlayCanvas, or Babylon.js. Well-nigh of these piece of work in a like manner, providing functionality to create archaic and custom shapes, position viewing cameras and lighting, roofing surfaces with textures, and more. They handle the WebGL for you lot, letting you work on a higher level.
Yes, using one of these means learning another new API (a 3rd party one, in this example), simply they are a lot simpler than coding raw WebGL.
Recreating our cube
Allow's look at a simple example of how to create something with a WebGL library. We'll choose Three.js, as it is one of the almost popular ones. In this tutorial we'll create the 3D spinning cube we saw earlier.
- To offset with, make a local copy of threejs-cube/index.html in a new folder, so save a copy of metal003.png in the same folder. This is the image we'll use equally a surface texture for the cube later on.
- Next, create a new file called
script.js, again in the same binder equally before. - Next, you lot need to download the three.min.js library and save it in the same directory as before.
- Now nosotros've got
3.jsattached to our page, nosotros can start to write JavaScript that makes use of it intoscript.js. Let's start past creating a new scene — add the following into your main.js file:Theconst scene = new 3.Scene ( ) ;Scene()constructor creates a new scene, which represents the whole 3D globe we are trying to display. - Next, we need a camera so we can run into the scene. In 3D imagery terms, the camera represents a viewer's position in the world. To create a camera, add together the post-obit lines next: The
const photographic camera = new Three.PerspectiveCamera ( 75 , window.innerWidth / window.innerHeight, 0.1 , 1000 ) ; camera.position.z = v ;PerspectiveCamera()constructor takes four arguments:- The field of view: How wide the area in front of the photographic camera is that should be visible onscreen, in degrees.
- The aspect ratio: Usually, this is the ratio of the scene's width divided past the scene's meridian. Using another value volition distort the scene (which might exist what you lot desire, but commonly isn't).
- The near aeroplane: How close to the photographic camera objects can be earlier nosotros stop rendering them to the screen. Think about how when you move your fingertip closer and closer to the space between your optics, eventually you can't see it anymore.
- The far plane: How far away things are from the photographic camera before they are no longer rendered.
- The third vital ingredient is a renderer. This is an object that renders a given scene, every bit viewed through a given camera. Nosotros'll create one for now using the
WebGLRenderer()constructor, simply we'll not use it till later. Add the following lines next:The first line creates a new renderer, the second line sets the size at which the renderer volition draw the camera's view, and the third line appends theconst renderer = new THREE.WebGLRenderer ( ) ; renderer. setSize (window.innerWidth, window.innerHeight) ; document.body. appendChild (renderer.domElement) ;<canvass>element created by the renderer to the document's<torso>. At present anything the renderer draws volition be displayed in our window. - Side by side, we want to create the cube nosotros'll display on the canvas. Add the following chunk of code at the bottom of your JavaScript: There'due south a bit more to take in hither, and so permit'south go through it in stages:
let cube; const loader = new Three.TextureLoader ( ) ; loader. load ( 'metal003.png' , texture => { texture.wrapS = THREE .RepeatWrapping; texture.wrapT = THREE .RepeatWrapping; texture.repeat. set ( 2 , two ) ; const geometry = new THREE.BoxGeometry ( 2.4 , two.iv , 2.4 ) ; const material = new THREE.MeshLambertMaterial ( { map : texture } ) ; cube = new Three.Mesh (geometry, fabric) ; scene. add (cube) ; depict ( ) ; } ) ;- We commencement create a
cubeglobal variable so we can admission our cube from anywhere in the code. - Next, we create a new
TextureLoaderobject, and then callload()on it.load()takes two parameters in this case (although it can take more): the texture we want to load (our PNG), and a office that will run when the texture has loaded. - Inside this function we use properties of the
textureobject to specify that we desire a 2 ten 2 repeat of the image wrapped around all sides of the cube. Next, we create a newBoxGeometryobject and a newMeshLambertMaterialobject, and bring them together in aMeshto create our cube. An object typically requires a geometry (what shape information technology is) and a cloth (what its surface looks similar). - Final of all, nosotros add together our cube to the scene, so call our
draw()function to start off the animation.
- We commencement create a
- Before we get to defining
draw(), we'll add together a couple of lights to the scene, to liven things up a bit; add the following blocks next:Anconst light = new Iii.AmbientLight ( 'rgb(255,255,255)' ) ; // soft white low-cal scene. add (lite) ; const spotLight = new THREE.SpotLight ( 'rgb(255,255,255)' ) ; spotLight.position. fix ( 100 , k , m ) ; spotLight.castShadow = true ; scene. add (spotLight) ;AmbientLightobject is a kind of soft light that lightens the whole scene a bit, similar the sun when you are outside. TheSpotLightobject, on the other paw, is a directional beam of light, more like a flashlight/torch (or a spotlight, in fact). - Terminal of all, allow's add together our
draw()part to the bottom of the code:This is adequately intuitive; on each frame, we rotate our cube slightly on its X and Y axes, then render the scene as viewed by our photographic camera, and then finally callfunction draw ( ) { cube.rotation.x += 0.01 ; cube.rotation.y += 0.01 ; renderer. render (scene, camera) ; requestAnimationFrame (draw) ; }requestAnimationFrame()to schedule drawing our side by side frame.
Let's have some other quick await at what the finished product should look like:
You can find the finished code on GitHub.
Note: In our GitHub repo you tin also find another interesting 3D cube instance — Iii.js Video Cube (run into it live also). This uses getUserMedia() to accept a video stream from a calculator web cam and project it onto the side of the cube equally a texture!
Summary
At this point, you should have a useful idea of the basics of graphics programming using Canvas and WebGL and what you can practise with these APIs, as well as a proficient idea of where to go for further information. Have fun!
See too
Here we have covered only the real nuts of sheet — in that location is so much more than to larn! The beneath articles will take y'all further.
- Canvas tutorial — A very detailed tutorial series explaining what y'all should know about second canvas in much more particular than was covered here. Essential reading.
- WebGL tutorial — A series that teaches the nuts of raw WebGL programming.
- Building upward a basic demo with Three.js — basic Iii.js tutorial. We as well have equivalent guides for PlayCanvas or Babylon.js.
- Game development — the landing folio for web games development on MDN. At that place are some really useful tutorials and techniques available here related to second and 3D sail — meet the Techniques and Tutorials menu options.
Examples
In this module
- Introduction to web APIs
- Manipulating documents
- Fetching information from the server
- 3rd party APIs
- Drawing graphics
- Video and audio APIs
- Client-side storage
Source: https://developer.mozilla.org/en-US/docs/Learn/JavaScript/Client-side_web_APIs/Drawing_graphics